Listing and Dashboard Instructions
Creating/Editing Your Vacation Rental Listing and Dashboard Instructions
IMPORTANT: Please be sure to add webmaster@shoresummerrentals.com as a contact in your personal email account (Gmail, Yahoo, Comcast, Hotmail, etc.) to assure that you receive all renter inquiries and assure they do not tag email coming from us as spam. If it is in your ShoreSummerRentals.com account, we sent it to your email provider and cannot control whether they deliver it to you or not, so adding us seems to correct the issue. Click here for detailed instructions.
While creating your listing, be sure to click submit often so that you do not lose your information. Please note that phone numbers, email addresses and/or external links are prohibited from being displayed in the property description field or note area. Our website has specific locations for this information, and our system is programmed to display this information in authorized areas only. If they are entered in these areas, they will be removed, and you will receive a warning.
Please also note that ads will not be activated live on the website until ownership is verified and listing is complete including several photos, rates and detailed descriptions. We will contact you if we cannot verify ownership from our end.
NEW OWNER LIST RENTAL PROCESS
1. Click on “LIST RENTAL”.
2. Go to the Membership you would like and click on “SELECT”.
3. Fill out the Registration page and click “REGISTER”.
4. Fill out the Listing Information page and click on “SUBMIT.
5. Continue to follow the next few prompts until you get to the “ORDER SUMMARY” page.
6. Enter promo code on this page if applicable and click “APPLY”.
7. Choose your Payment Type.
8. Check the “I agree to your Terms of Use and Legal Disclaimer” button.
9. Click on “PROCEED TO MAKE PAYMENT”.
10. Enter your payment details and click on “MAKE PAYMENT”.
11. Once payment is made, you will be directed to your dashboard.
12. Click on EDIT to enter the details of your home and to upload your images.
13. Click on RATES to enter your rental rates.
14. Click on CALENDAR to update your availability calendar.
15. View our instructions on editing and creating your listing here.
16. Click on PREVIEW to see how your rental listing appears on ShoreSummerRentals.com.
DONE. We will be in touch by email within 24 hours after we review your listing and verify ownership. If we cannot verify ownership on our end, we will ask you to supply us with a utility bill or the like.
MULTIPLE LISTINGS: We offer gracious discounts. Contact us for pricing.
To add additional listings, click on the green ADD NEW LISTING button located in the upper left corner in your dashboard and the system will walk you through the process.
ENTER EYE-CATCHING LISTING TITLE
Make sure you have an eye catching listing title that will stand out. This is very important.
(Please note the character limit is limited to 70 characters for formatting purposes).
ENTER DETAILED DESCRIPTION
Be sure to enter very detailed descriptions that highlights your rental property in the best possible light. The more descriptive you are, the more rentals you will secure.
ENTER CONTACT INFORMATION
1. Enter the contact information of the person who will receive emails from potential rentals. This can be someone other than the account holder. If this is the same person as account holder, you still need to fill in the fields. You are permitted to enter three different email addresses of where you would like to receive rental inquiries. This is also where you can opt-in to receive text message alerts when a renter contacts you.
EDIT CONTACT INFORMATION
1. Login to your account.
2. Click on “EDIT”.
3. Follow instructions above.
ENTER VACATION RENTAL LOCATION / GOOGLE MAPS
1. Enter the vacation rental location very carefully.
NOTE: Please note that in order for the Google map feature to work, you need to have your street address ONLY in the address field. For example, you cannot have "123 Summer Street (near 4th Street)" in the address field. It does seem to work if you have "123 Summer Street, 2nd Floor" though. If you still notice that the map is showing incorrectly, go to the property location field when logged in and tab out of the field. This fine tunes the map.
EDIT VACATION RENTAL ADDRESS / GOOGLE MAPS
1. Login to your account.
2. Click on “EDIT”.
3. Follow instructions above.
UPLOAD IMAGES
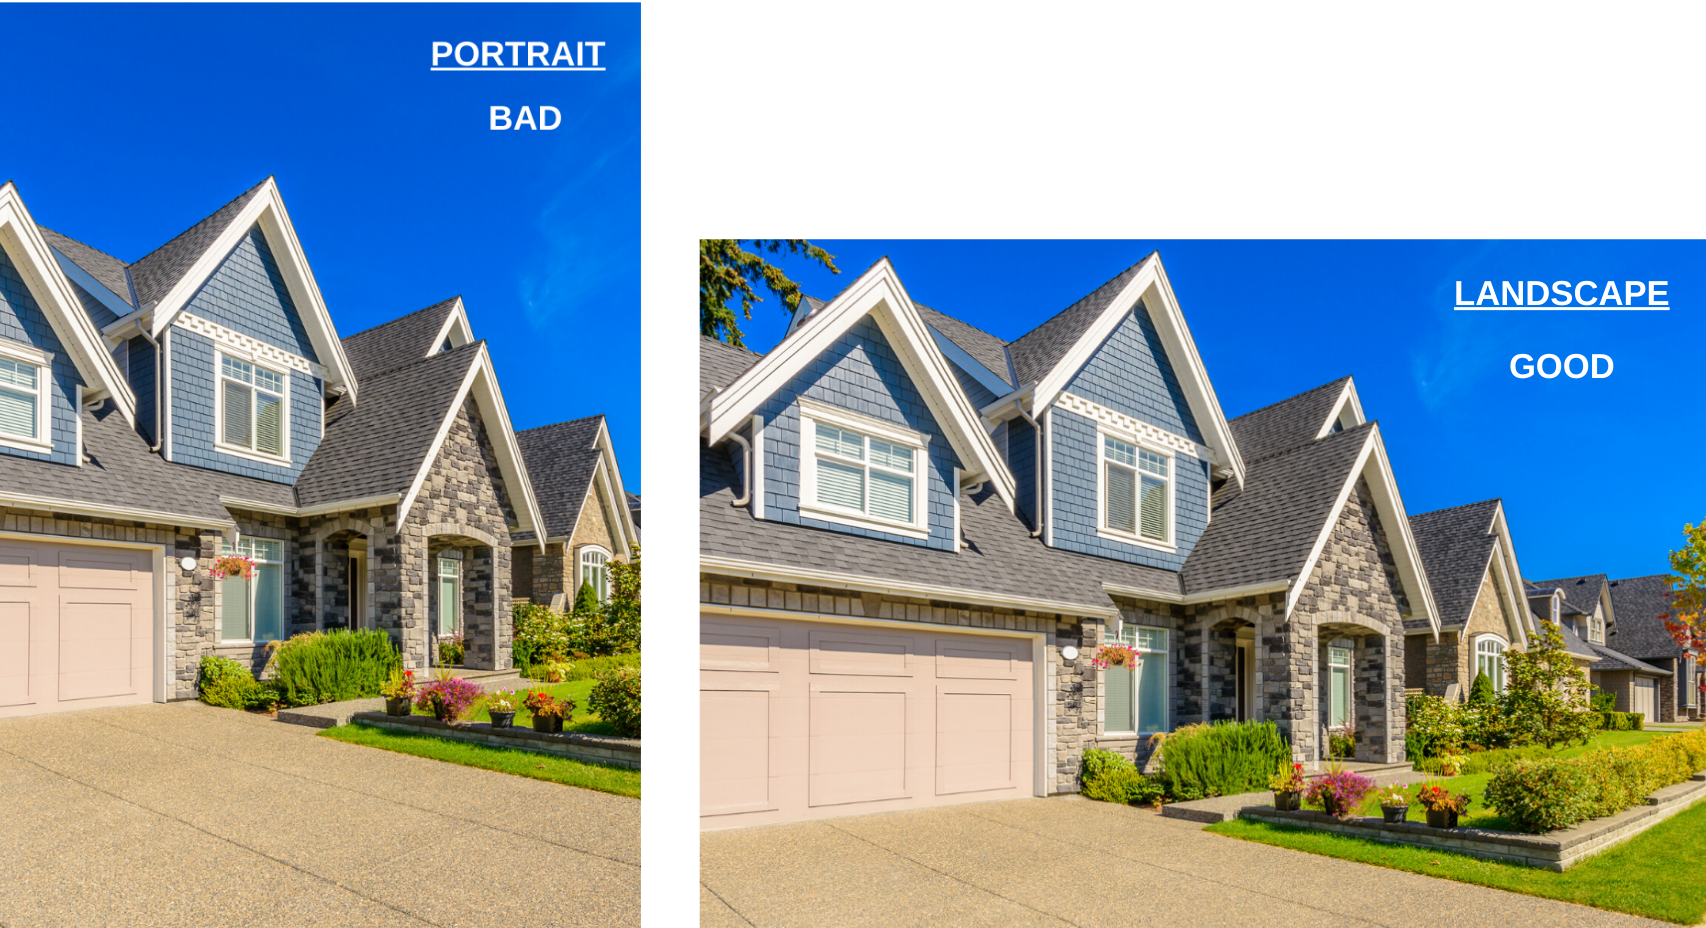
VERY IMPORTANT: Please try to upload images that are in landscape orientation ONLY. Landscape images showcase your home in a much better light. Portrait images display cut off at times.
1. Click on the blue “UPLOAD IMAGE(S)” button.
2. Locate the image(s) on your computer, highlight the photos you want to upload and hit the return key on your computer. Multiple images can be uploaded.
3. Add a caption and click “SAVE” under each image individually to save the caption.
4. You have the option to rotate the images if needed.
5. You have the option to rearrange the images by clicking and dragging them in the order preferred.
6. The first photo will be your main.
Upload up to 32 appealing photos of your home and surrounding outside area.
Click the “SUBMIT” button at the very bottom of this Listing Description page to save the photos. Images must be under 8 MB in size. If they are larger, please resize before uploading.
EDIT IMAGES
1. Login to your account.
2. Click on “EDIT”.
3. Follow instructions above.
ENTER DETAILS
Continue filling out the remaining items such as number of bedrooms, blocks to beach, views, development name, etc.
EDIT DETAILS
1. Login to your account.
2. Click on “EDIT”.
3. Follow instructions above.
ENTER YOUTUBE LINKS
You can enter up to 3 external YouTube links that showcase your rental listing.
1. Enter YouTube video description.
2. Enter YouTube video URL.
All links must be approved and must reside only in the authorized section. This feature is solely for the purpose of advertising the subject property and/or local information of the towns that your property is located. No competitor or inappropriate links are permitted and will be removed. If competitor or inappropriate website links are displayed, we have the right to suspend your listing without refund.
EDIT YOUTUBE LINKS
1. Login to your account.
2. Click on “EDIT”.
3. Follow instructions above.
ENTER AMENITIES
1. Login to your account.
2. Choose all amenities that your rental home offers.
EDIT AMENITIES
1. Login to your account.
2. Click on “EDIT”.
3. Follow instructions above.
ENTER ACTIVITIES
Choose all activities that your surrounding areas offers.
EDIT ACTIVITIES
1. Click on “EDIT”.
2. Follow instructions above.
Once you get to this point, click the SUBMIT button at the bottom of the page and this will bring you to your account dashboard.
DASHBOARD
This will be where you can enter your rates, payment terms, calendar, purchase add-on’s, update special's pages, renew your rental listing, view traffic, email inquiries and much more (see below).
ENTER RENTAL RATES
1. Login to your account.
2. Click on “RATES”.
3. Enter your rates by day, week, weekend, monthly and/or seasonal and click "Save".
NOTE: Most properties are searched by rates so if your rates are not posted in the actual rate table, your ad will not show up when someone searches by rates.
EDIT RENTAL RATES
1. Login to your account.
2. Click on “RATES”.
3. EDIT RATES - click on “EDIT” next to the line you want to edit. Make the changes and click “Save”.
4. DELETE RATES - To delete rates already entered you either click on the red “DELETE” button on the right of each line or check “SELECT ALL” on the left and then click on the “DELETE ALL SELECTED” button on top.
5. Then follow instructions above to enter new rates.
ENTER ADDITIONAL RATE INFORMATION
1. On the same page as the rates, scroll down to fill in the information regarding other fees, check-in, check-out, payment terms and any additional notes.
2. Click the Save button at the bottom of the page.
EDIT ADDITIONAL RATE INFORMATION
1. Login to your account.
2. Click on “RATES”.
3. Follow the instructions above.
>> View a quick video on how to edit/enter rates here.
ADD A SSRNJ.COM DIRECT BOOKING TO OUR CALENDAR
1. Login to your account.
2. Click on “CALENDAR”.
3. Click on "ADD MANUALLY" button.
4. Look to the right and enter: arrival date, departure date, customer name (not required) and rental source (not required).
5. Select Booking Status: Confirm or Pending.
6. Click the Save button.
7. Confirm the dates entered are correct.
* Note: if you have a pending booking, be sure to log back in when the booking is confirmed and click the CONFIRM button for that time period.
MANUALLY EDIT OR DELETE A SSRNJ.COM DIRECT BOOKING
1. Login to your account.
2. Click on “CALENDAR”.
3. Look to the right under RESERVATION LIST.
4. Click on “EDIT” next to the booking ou want to edit or delete.
5. To edit booking, make the changes and click the “SAVE" button.
6. To delete booking, click the "DELETE BOOKING" button.
SYNC SSRNJ.COM CALENDAR AND EXTERNAL CALENDARS
View instructions here.
OTHER DASHBOARD ITEMS
PREVIEW
This will display what your rental listing will look like to the public on the website.
ADD-ON’s
This is where you can view all of the Add-On's that we offer and then purchase or renew by following instructions below.
VIEW ALL ADD-ON'S
1. Login to your account.
2. Click on "ADD-ONS" in blue area.
PURCHASE ADD-ON(S)
1. Login to your account.
2. Click on "PURCHASE OR RENEW ADD-ONS".
5. Check the add-on’s you would like to purchase or renew.
6. Make sure only the items you are currently going to pay for are checked.
7. Click on “PROCEED TO CHECK OUT” at the bottom of the page.
8. Choose Payment Method on the left and click “PROCEED TO MAKE A PAYMENT” or “CONTINUE” if paying by check.
9. The system will walk you through payment.
CREATE/EDIT SPECIAL'S PAGES
1. Login to your account.
2. Click on "Enter or Edit Special's text" under the listing you have special.
3. Make sure the special is toggled to ACTIVE if you want it to appear on your listing and Special's page. If not, turn it to PAUSE.
4. Click on "ADD/EDIT SPECIAL" in the blue box off the special you would like to create.
4. Be sure to hit the SAVE button.
5. Your Special will now appear on your rental listing as well as the designated Special's page.
RENEW ADD-ON’S
1. Login to your account.
2. Click on “RENEW LISTING" or "PURCHASE OR RENEW ADD-ONS”.
3. Check the listings and add-on’s you would like to renew.
4. Make sure only the items you are currently going to pay for are checked.
5. Click on “PROCEED TO CHECK OUT” at the bottom of the page.
6. Choose Payment Method on the left and click “PROCEED TO MAKE A PAYMENT” or “CONTINUE” if paying by check.
7. The system will walk you through payment.
NOT RENEWING AT THE SAME MEMBERSHIP LEVEL?
1. If your listing is still active, you need to contact us to downgrade or upgrade, otherwise click on “EDIT” next to the Membership Type.
2. Choose Membership Type.
3. Click “SUBMIT”.
4. On the Dashboard look to the right and click on "RENEW LISTING".
5. Follow steps 3 through 8 above.
ADD NEW LISTING TO YOUR CURRENT ACCOUNT.
1. Login to your account.
2. Click on “ADD NEW LISTING”.
3. The system will walk you through the same process as your original purchase. See above for detailed step by step instructions.
ACCESS YOUR TENANT REVIEWS
1. Login to your account.
2. You can access reviews of your rental home on the right side at the bottom of page.
3. If you would like to receive an email notifying you that a renter has submitted a review of your home, click on the Dropdown menu and then “OWNER SETTINGS” on the upper right hand side. On the bottom of the page, you will have the option to opt-in. Don't forget to click the "SUBMIT" button to save.
HOW TENANTS CAN SUBMIT A REVIEW
1. Login to your account.
2. You can access reviews of your rental home on the right side at the bottom of page.
3. If you would like to receive an email notifying you that a renter has submitted a review of your home, click on the Dropdown menu and then “OWNER SETTINGS” on the upper right hand side. On the bottom of the page, you will have the option to opt-in. Don't forget to click the "SUBMIT" button to save.
CHANGE PASSWORD
1. Login to your account.
2. Click on the Dropdown menu and then “OWNER SETTINGS” on the upper right hand side.
3. Enter current password.
4. Enter new password.
5. Re-enter new password.
6. Click the “Submit” button at the bottom of the page in order for the change to save.
RENTER INQUIRY TEXT MESSAGE OPTION
Activate your listing contact phone number to receive a text message notifying you that a renter has sent you a rental request.
1. Login to your account.
2. Click on "Edit" under the rental listing you would like to receive a text.
3. Scroll down to the contact area, this is where you will have the option to opt-in.
4. Click the “Submit” button at the bottom of the page in order to save.
RENTAL LEAD LIST
Active Shore Summer Rentals owners have exclusive access to our private Rental Lead List. These are rental requests that we receive from renters who contact us directly instead of searching on their own. Feel free to contact anyone below if you have accommodation that match their request.
1. Login to your account.
2. Click on orange “RENTAL LEAD LIST” button at the top of your dashboard.
3. View all leads and contact the renters directly if you have something that matches their request.
MY PROFILE
You can add/update your profile if you wish. This is absolutely optional of course!
1. Login to your account.
2. Fill out form including your birthday. You may receive a gift
3. Upload photo if you wish.
OWNER’S TOOLS
We have implemented a section in the dashboard for all of our active owners to access sample leases, rental sign form, checklists and more.
1. Login to your account.
2. Click on “Owner’s Tools” on the right side of the dashboard.
3. Feel free to download any documents provided to your computer.
ACTIVITY REPORT
You can view the traffic statistics including number of listing views and number of email inquiries in your dashboard. You can also reset page views here as well.
1. Login to your account.
2. Scroll to the right bottom section of the page to view the above mentioned items.
RENTER EMAIL LEADS
You can view your renter email inquiries in your dashboard.
1. Login to your account.
2. Scroll to the right bottom section of the page to view the above mentioned items.
LISTING PAYMENT OPTIONS
Our hosts can pay for our yearly membership with most credit card types. We also accept Paypal and personal check. We have an auto renewal option that hosts can set up. All accounts that are set up with auto renewal will automatically receive a 10% DISCOUNT of the entire purchase, PLUS a FREE NEWSLETTER BLAST (another $99 value). If you have auto renewal turned OFF, you must login to your account to manually renew. Once logged in, choose "Renew Listing" and the system will walk you through the renewal process.
>> View our auto renewal details here.
>> View our short video on how to turn auto renewal ON/OFF.
TRANSACTION/BILLING HISTORY
You can view and access your billing transaction and history in your dashboard.
1. Login to your account.
2. Click on “Transaction/Billing History” on the right side of the dashboard.
LOG OUT OF YOUR ACCOUNT
1. Click on the Dropdown menu on the upper right hand side.
2. Click “SIGN OUT”.
As always, do not hesitate to contact us with questions or help!